Showing posts with label sewing tips. Show all posts

Thursday, April 4, 2013

Thursday Tips and Tricks

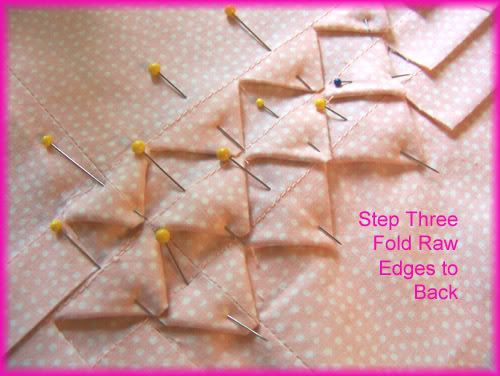
Today I decided to give out two tips.  The first one is actually a finish used on clothing but I thought it would also make a great border embellishment on a quilt.


The "shark teeth finish" is typically a clothing design but can you just imagine this look all around a quilt border?  I think this would look beautiful on an heirloom quilt in a shabby chic design.  I hope you give this technique a try, I think I certainly will use it sometime soon.

The second tip is how to create a variety of looks using a simple striped fabric block.  It's all in how you cut it out and reposition it.


Using striped fabric you can create some beautiful block designs with a lot less sewing.


Create this beautiful Seminole Patchwork design by simply offsetting the stripes.  You will find a variety of design combinations to use in this tutorial. 

Let your imagination run wild and see if you can incorporate the "sharks teeth" into your sewing or quilting or create a beautiful quilt with striped fabrics.  I hope that somewhere along your travels down " life in the craft lane" you are able to use these ideas.  Drop in and share your thoughts or if you have been looking for a tutorial on a particular technique just let me know and I will help you search the internet.  It could be something others have been looking for also.
Thursday, March 14, 2013

Thursday Tips and Tricks


Today I want to share a great sewing tip that I found helpful and you might too. I will also show you how I adapted this method and found it very helpful in sewing my binding strips together.

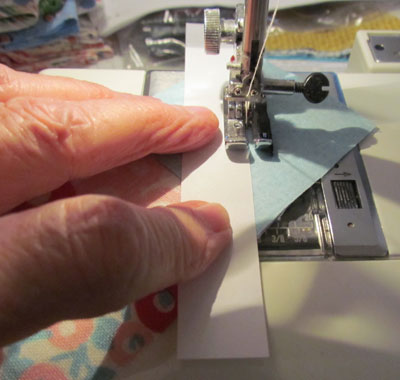
Tired of marking your fabric squares to create HST (half square triangles)?  This tip from Quiltmaker Blog is the answer for you and the tip is "courtesy of Donna Amos, a member of the 2011 QM Scrap Squad". Use a piece of cardboard to line up your stitching line?  How clever!


I decided to use this method to piece my binding strips together and it worked beautifully.  Since I would be trimming the strips after sewing I left the selvage edges on and doing this also made the stitching line much easier to line up with the cardboard.  Instead of cutting a strip of cardboard I took the cardboard insert from a package of bias fold tape and used it to line up my sewing lines. Using my selvage edges as a guide to line up my cardboard I stitched close to the cardboard edge, making sure not to sew over it.  After sewing all my strips together I trimmed the excess off with my rotary cutter. If you have a longer seam or stitching line to sew just cut out a piece of cardboard to size.  I have a separate rotary cutter that I use for paper so I wouldn't have to use my fabric cutter.


I found this to be a quick and easy way to get my binding sewn together without having to mark fabrics and I can see that using it for HST or other corner to corner sewing will be a great help.

Hope you find this little tip helpful and time saving as you travel the road down "life in the craft lane"