Showing posts with label quilting tools. Show all posts

Thursday, March 14, 2013

Thursday Tips and Tricks


Today I want to share a great sewing tip that I found helpful and you might too. I will also show you how I adapted this method and found it very helpful in sewing my binding strips together.

Tired of marking your fabric squares to create HST (half square triangles)?  This tip from Quiltmaker Blog is the answer for you and the tip is "courtesy of Donna Amos, a member of the 2011 QM Scrap Squad". Use a piece of cardboard to line up your stitching line?  How clever!
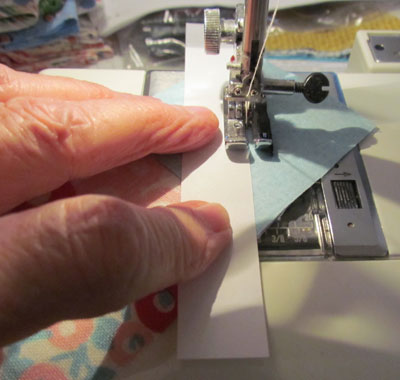

I decided to use this method to piece my binding strips together and it worked beautifully.  Since I would be trimming the strips after sewing I left the selvage edges on and doing this also made the stitching line much easier to line up with the cardboard.  Instead of cutting a strip of cardboard I took the cardboard insert from a package of bias fold tape and used it to line up my sewing lines. Using my selvage edges as a guide to line up my cardboard I stitched close to the cardboard edge, making sure not to sew over it.  After sewing all my strips together I trimmed the excess off with my rotary cutter. If you have a longer seam or stitching line to sew just cut out a piece of cardboard to size.  I have a separate rotary cutter that I use for paper so I wouldn't have to use my fabric cutter.


I found this to be a quick and easy way to get my binding sewn together without having to mark fabrics and I can see that using it for HST or other corner to corner sewing will be a great help.

Hope you find this little tip helpful and time saving as you travel the road down "life in the craft lane"

Saturday, July 30, 2011

Creativity Day 7 - Adding the Finishing Touches

Actually yesterday was supposed to be day 7 but sometimes the ideas just take a bit longer to actually turn into realities.

When I was sewing my paper pieced sections together it came to me that this would make a cute tote so as soon as I was done with the circle I took it apart and started working on my idea.


The little tote has a a lining with a double pocket on the inside, one open pocket and one with a zipper to secure valuables.  The tote itself has a magnetic closure so that everything says out of sight inside the purse.


This project has taken five days to complete but now I have some new found knowledge and inspiration for future projects.  I have learned that using my computer to design can be fun and inspiring and making a Mariner's Compass quilt block is no longer as intimidating as it used to be.

Tomorrow starts my second week of my Creativity Project and I hope my readers continue to drop in and comment or share ideas with me.

Tuesday, July 26, 2011

Creative Day 4 - New Tools

"Progress is not created by contented people."
Frank Tyger
Creative Day 4 

Sometimes creativity is not just about making something but it is about learning something new.  As a quilter I have many tools that are used to create designs, rulers of all sizes, templates for cutting out shapes, books with patterns, sewing machines, quilting machines, and a computer.  I use most of these tools daily but the one I have not used very much is my computer, that is until today.  I decided to utilize my computer to create a paper pieced pattern that I have wanted to try for a long time but never had the courage to do before.

A Mariner's Compass Quilt Block has always seemed too difficult to do but I have always wanted to give one a try and I decided that learning to draft one was probably a good starting point.  I have Electric Quilt programs 6 and 7 and have used them occasionally to draft custom blocks for my memory quilts but never to create a mariner's compass. After a bit of research I found a great tutorial on-line to get me started, http://freelessons.jantsutopia.com.au/ ,and after reviewing it I gave it a try.  It took me several attempts before I finally got a design that I was pleased with and that I could convert to the type of pattern I wanted.

After working on the computer most of the day I finally have a pattern for a 12 inch block that I can convert to paper piecing and start working on.  It is not an extremely complicated pattern but for my first try I think it is a good place to start.

Tools are very useful but sometimes the tools themselves can seem scary to use. We keep them around because the intentions are always there to learn more about them but we put off using them because of the time it will take to become comfortable with them.  Tools are by definition:  a device for doing work, a means to achieve something, something used in the course of somebody's everyday work, so today I learned how to use one of my many tools and really had fun doing it.

If you drop in please leave a comment and let us know what tools do you have that you have yet to make the most of or which tools are your favorite.