Saturday, October 20, 2012

Party of Four

After a long time in the works I am happy to announce that my quilt pattern, "Party of Four",will be published in McCalls Quick Quilts December/January 2013 issue.


"The fun block setting in this Party of Four lap quilt pattern lends itself well 
to many different fabrications.  
Choose 4 favorite fabrics with good contrast, and make your own version!

To see more quilts and other projects by Aurora Ann Woods, 
visit her website, quiltingfrenzy.com."

This lap quilt is a fast and easy project and can be made from fabrics you may already have in your stash.  It also lends itself well to a scrap quilt look.  This is my version of a scrap quilt design of my pattern.


I hope that others enjoy putting this design together as much as I did.


Tuesday, October 16, 2012

100 Days on Pins and Needles

Tea Cup or Coffee Cup Pincushion


Day 6

After an extra long weekend I am back on the trail of new pincushions and today it is a Tea Cup Pincushion. This one I purchased for myself at a craft show but I love learning new things so this project seems easy and quick to do.

Google has been my friend and today was no different, I found several good tutorials to highlight.  There are also You Tube videos that have great visual and auditory instructions I have added a link to one video below but look around and you will find many.

http://www.youtube.com/watch?v=48s2bheqGKE

There are also other blogs that feature tutorials on how to make them that have simple and easy to follow instructions.

http://mmmcrafts.blogspot.com/2008/05/make-teacup-pincushion.html

A great website is You Can Make This, here you will find patterns of all kinds and I found a free pattern on how to make a teacup pincushion.  You have to sign up to access the free patterns but sign up is free and there are patterns for many different kinds of items  They also have patterns for sale on this site and most are fairly inexpensive.

https://www.youcanmakethis.com/products/free/free-teacup-pincushion-tutorial.htm

I didn't have a teacup so I used an inexpensive coffee mug for mine.  Since a coffee mug is deeper than a teacup or regular coffee cup I filled in part of the cup with a 1 inch Styrofoam circle that I found at a craft store.  You could probably use wadded up paper or foam peanuts or half a foam ball to take up the extra space.  Here is my creation..


All the tutorials I found were great and if you want to make your own any of the links I have listed should give you a good place to start.  If I kept every pincushion I made I would soon be overrun with pincushions so I have listed this little item in my Etsy shop.  Just click on the link under the photograph.

Have fun creating your own great designs.


Friday, October 12, 2012

100 Days on Pins and Needles

Sunbonnet Sue Needlebook 

Day 5


I wish I had a pattern to share with everyone but I honestly don't remember where I first saw this little needlebook. I tried to Google a pattern and although I found many patterns, none of them were like this one.

I don't even remember where I first saw this needlebook, I just remember thinking that it was so darn cute I just had to make my own version.  I created a pattern to make a cute little book a few years ago as a Christmas gift for a friend and this is my version of the Sunbonnet Sue Needlebook.

Since I could not find a pattern similar to the one I had made I did find some links to pictures and projects that I am happy to share with you so you can get yourself started on your own project and add your own ideas to it.

http://archive.blisstree.com/look/updating-vintage-sunbonnet-sue-needlebook/

http://crazyhaberdasher.blogspot.com/2007/08/needlebooks-part-two.html

http://www.mnhs.org/library/about/LibraryDisplay01/03tools.html

Sunbonnet Sue                  

 Sunbonnet Sue


The following link comes with a pattern to create your own Vintage Sunbonnet Sue Needlebook.

http://www.gather.com/viewArticle.action?articleId=281474977388455


These two are my creations and adaptations of a Sunbonnet Sue needlebook.  I hope that the links I have provided will inspire someone to come up with their own creations to add to their collection.  

Thursday, October 11, 2012

100 Days on Pins and Needles

Sometimes the inspiration is right in front of you.

Day 4

Today I am not doing a tutorial, I have several family issues that need my attention so I don't really have time to "create" anything.  I did want to keep up my search for possible projects so I decided to photograph my own collection of pincushions.  Some I made, some I purchased,some I have received as gifts over the years and some I was not able to photograph because they are in use as we speak.  The inspiration was already around me, all I had to do was look.


I am taking the weekend (Saturday and Sunday) off to work on some tutorials for next week and I hope to do my own spin on some of the ones that you see here in my collection. 


I will post a really cute tutorial tomorrow so please check back because I have saved my favorite for the end of the week.  I hope those that have checked in daily will continue to check back and see what is going on in my head as I continue to create a super collection of pincushions and needle books.


Wednesday, October 10, 2012

100 Days on Pins and Needles

Large Flower Pincushion Tutorial


Day 3

I am sure that most of us have seen the old tuna can pincushions, some of us may have made some of these for our mothers as gifts when we were children.  I took an old standard and again put my own spin on it to create a cute flower design.

Materials List

small empty tuna can or pet food can
3 sheets of acrylic craft felt: 2 sheets in the color of your choice for petals, 1 sheet to cover the can
9" diameter cotton fabric circle for pincushion
polyester fiberfill
hand sewing needle
thread
scissors
pinking shears or rotary cutter with pinking blade
sewing machine

1.  I covered the bottom and sides of the can with acrylic felt using the same method as I used in my Felted Wool Bottle Cap Pincushion.  Remember to leave about 1/2 in excess fabric across the top of he rim.


2.  Layer your flower petal felt fabric and cut out 6 sets of flower petals or as many as you need or want to go around the can. You can draw a paper pattern or just cut them out free hand, which is what I have done. Pin petal sets together so that you don't mix them up. Using your pinking blade or shears trim around the edges to give them a nice finish.


3.  Using your sewing machine stitch down the center of the petal and then continue to stitch back and forth moving out until the petal is totally covered.  If you want you can do whatever kind of stitching you like as I have shown on the red petal. You can use a contrasting color of thread or a matching color, the choice is yours. This stitching helps the petals stability making them easier to work with.


OPTIONAL:  I made a small 4" diameter circle of muslin and filled it with crushed walnut shells to place on the inside of my pincushion.  The walnut shells are supposed to help keep your pins and needles sharp.  You can do this also if you feel confident enough to make your own.

4.  Once all your petals are stitched pin them around your can.  If you want to add more you can do so at this point.  Using a needle and thread tack each petal in place, this will make it easier to work with.


5.  Using a glue gun add a dot of glue to the inside of the can and press the petals down in place.  Don't worry about how the petals are positioned at this point, you will adjust that when you are finished.  Set the can aside for now.


6.  Take your 9" circle and sew a running stitch around the outside edge with your needle and thread pull tight to form a "cup" shape.

       
OPTIONAL:  If you have made a pouch filled with crushed walnut shells place it in the center of the "cup" at this point.

7.  Stuff the "cup" shape firmly with polyester fiberfill batting and pull your thread tightly to form a ball shape. Work your shape until it looks somewhat uniform in shape.


8.  Take your fabric "ball" and stuff firmly into the middle of the can until if sits firmly on the bottom.  If you like you could add hot glue to the inside of the can but your fabric ball should be firm enough and snug enough to not need it.


9.  Take the lip edge of the felt used on the side of the can and stuff it into the can pushing the petals down down also.  This will help keep the pincushion sitting tightly in the can.


10.  Once you have it stuffed securely into the can you can then form your petals into a flower shape.


Make your own if you like or click on the link above and purchase this beauty or one like it.  Whatever you choose I hope you enjoyed Day 3 of 100 Days on Pins and Needles.

Tuesday, October 9, 2012

100 Days on Pins and Needles


Felted Wool Needlebook Tutorial


Day 2

As I researched options to feature I wanted to keep the tutorials simple for a beginner but not so simple that the project would be boring or look boring. Today I am going to show you my version of a needle book that I found on line. You know how sometimes you see a pattern that is simple to make and useful in its own right but you just have to add your own spin to it?  Well this is how I felt about this next pattern so I made a few alterations and here is what I came up with.  The included link actually gives you instructions on how to felt your own wool if you should decide to get adventurous, I used felted wool I had purchased at the fabric store.

two 6 X 5 inch rectangles of felted wool
4 1/2 X 5 1/2 inch rectangle of batting (you can use cotton or polyester batting)
one piece 2 1/2 X 1 1/2 inch felt rectangle
one piece 2 X 1 inch felt rectangle
2 die cut daisies and a coordinating button
Embroidery floss
Sewing machine or you can do all your stitching by hand if you choose.
Pinking shears or rotary cutter with pinking blade (I used a rotary cutter with a pinking blade)

1.  Layer your 6 X 5" rectangles and trim around the edges using your pinking blade or shears.  Just cut enough off the edges to give it a nice finish.


2.  Trim the small rectangles with your pinking blade or shears and position the small rectangles (book pages) on the inside of the folded wool rectangle as shown in the picture.  Sew down the rectangles using your sewing machine or hand stitch with a running stitch along the top edge of the rectangle.  I only added these to one side of the book but you could do 4 sections with 2 on each side.


3.  The pattern calls for cutting out a leaf pattern but you could do whatever design you like. If you are doing the leaf pattern follow the directions in the link.  I did a small die cut flower shape with a button center stitched down by hand.  I centered it on one side of the outside cover and stitched it down with the button center.


4.  Layer your front cover, your batting and then your inside cover and stitch around the edges by hand or with your sewing machine. Be careful not to catch your applique design on the front as you stitch around the edges.


5.  Fold in half and press to mark center fold.  Using your sewing machine make a stitching line along the fold line.  If you like you could just do it by hand and sew a running stitch along the fold.


6.  Since I added the batting and a second layer of wool lining the needlebook really did need something to keep it closed.  I took some embroidery floss, using all six strands, sewed it to the back cover of the book knotting it in place to secure and leaving approximately a 4 inch strand.


7.  Close your book and take the strand of embroidery floss and wrap around the button in the center of the flower to secure it closed.


This was a quick project to put together and also makes a great addition to any sewing kit.  They are easy enough to put together to give as gifts to all your quilting or sewing friends

I hope that you all find this project to be fun and can find other creative ways to embellish your covers.  Just imagine doing an embroidered design on the front or personalize it with machine embroidery to make a special gift to give or just keep for yourself.

If you drop in please leave a comment and let me know what you think of my tutorials.  I always enjoy hearing from my readers.

Monday, October 8, 2012

100 Days on Pins and Needles


Felted Wool Bottle Cap Pincushion Tutorial 


Day 1

Recently I began creating pincushions of different kinds and it came to me that it might be of interest to others to see the many styles of pincushions and needle books there are out there.  With this in mind I have decided to begin a new project of creating 100 different kinds and styles of pincushions and needle books.  My goal is to create one new item every weekday until I have created 100 different ones.  I hope that there will be readers out there in cyberspace that will like to follow along in my journey.

Pincushion #1:  A bottle cap pincushion, a tiny little item that can easily be carried in a small sewing kit, usually created from a recycled plastic water bottle or soda bottle cap.  I decided to make mine a bit larger and use a 2 inch diameter plastic bottle cap from a juice bottle.  I had never made one before so I Googled instructions and found several sites to give me a good basis where to start.


Using these tutorials I came up with my own pattern and instructions

Here is the materials list and the steps I took to make my own style and size of bottle cap pincushion.


 Materials:
bottle cap ( I used a juice bottle cap that measured approximately 2 inches across)
felted wool or acrylic wool  (I used bits of felted wool)
Polyester fiberfill
thread (you can match your felt or use a contrasting color depending on how you want it to look)
hand sewing needle
small sharp scissors
beads or buttons for decorations (optional)
clear floral stones that are flat on one side ( to add a bit of weight to the pincushion)
jewel glue (make sure it is permanent glue used to adhere beads, rhinestones, etc to fabric)
hot glue gun or fabric glue

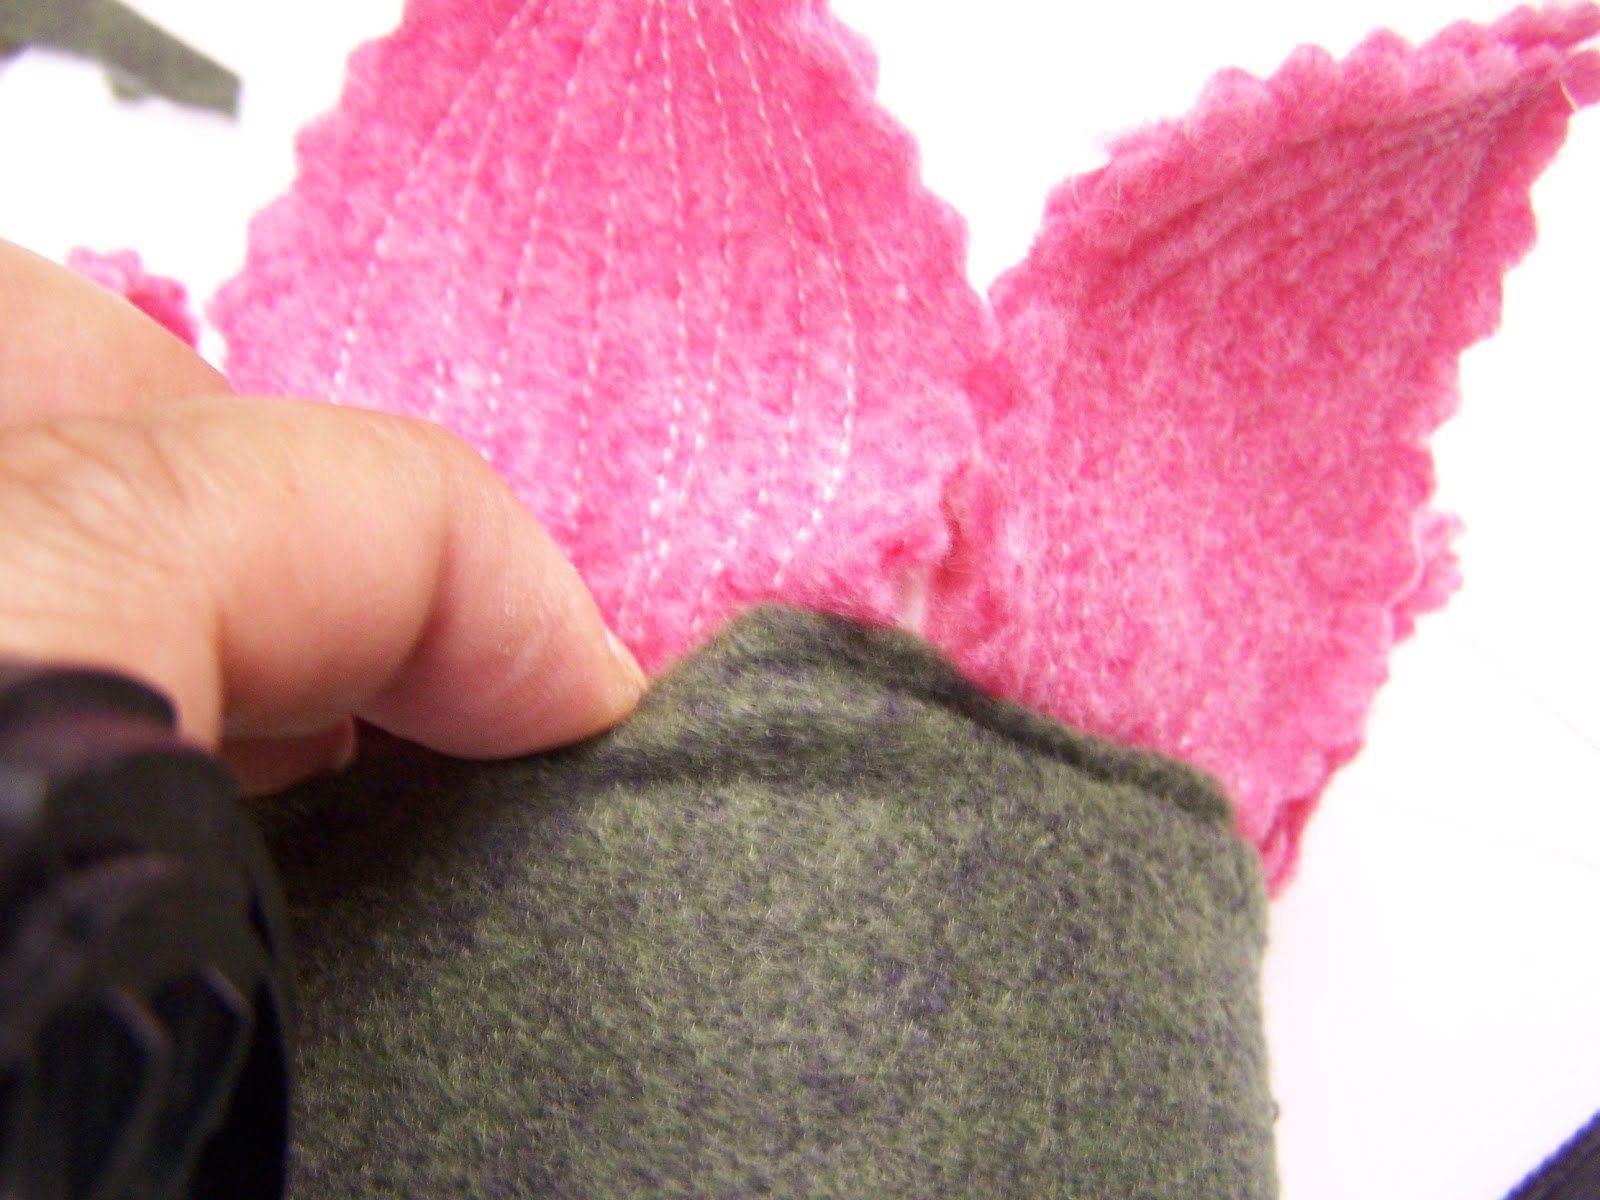
1.  Most instructions ask you to cut out a circle.  I decided to place some jewel glue in the center of the cap and then place onto a small square of fabric then I just trimmed around the cap with a small pair of sharp scissors.


2.  Cut a strip of felt to fit around the bottle cap, make sure you cut it about 1/8 to 1/4 of an inch wider than the lip of the bottle cap.  Cut it long enough to go around the cap and slightly overlap on the other edge.  You can use a rotary cutter and cutting mat or just use a pair of scissor like I did.


 3.  I don't do embroidery so I used matching thread and did a simple whip stitch to attach the strip of felt to the felt on the base of the bottle cap.  The glue on the bottom of the cap helps to hold the base felt in place so all I had to do was to hold on to the edge strip of felt while I sewed around the base.

4.  Stick the floral stones to the inside of the cap with hot glue. This will help to hold everything together when sewing the top of the pincushion on.


5.  Cut out a circle 3 1/2 inches in diameter.  If you want you can decorate your circle with the beads or buttons at this point or you can wait until you are finished making your pincushion.  It is easier to decorate the circle while it is flat but the choice is yours.  I was using beads so I decided to decorate it now.  If you want to do an embroidered design that would look great too.

6.  Sew a running stitch around the outer edge of the circle and pull tight to create a small "cup".  Stuff the "cup"  firmly with polyester fiberfill then tie off your thread.


7.  You can hot glue the top of the pincushion in place over the floral stones, or just hold it in place and stitch the top to the side strip of the cap.

  
8.  Using a hot glue gun with a fine tip point I added a thin line of glue along the edge of the side strip and added some metallic braiding to finish it off.  You could also use fabric glue if you do not have a glue gun or rather not use one.


9.  I decided a few more beads were needed and so I sewed on a few more and then I added 3 usable quilter's pins as an extra decoration.

  
10.  I did a second one and instead of metallic braiding I added pearls that come pre-strung and sold on a spool or by the yard at any JoAnn Fabrics or Hobby Lobby.  I stitched them on taking a stitch between beads using white thread.


These pincushions are fun and easy to put together and would make great gifts.  Decorate them however you like adding beads, sequins, felt cutouts or embroidery, the possibilities are endless and only restricted by your imagination.

I hope you find this tutorial easy to understand and follow.  If you use my directions please let me know and please share photos too, it would be great to see what others are making.