Felted Wool Bottle Cap Pincushion Tutorial
Day 1
Recently I began
creating pincushions of different kinds and it came to me that it might be of
interest to others to see the many styles of pincushions and needle books there
are out there. With this in mind I have decided to begin a new project of
creating 100 different kinds and styles of pincushions and needle books.
My goal is to create one new item every weekday until I have created 100
different ones. I hope that there will be readers out there in cyberspace
that will like to follow along in my journey.
Pincushion
#1: A bottle cap
pincushion, a tiny little item that can easily be carried in a small sewing
kit, usually created from a recycled plastic water bottle or soda bottle cap.
I decided to make mine a bit larger and use a 2 inch diameter plastic
bottle cap from a juice bottle. I had never made one before so I Googled
instructions and found several sites to give me a good basis where to start.
Using these tutorials
I came up with my own pattern and instructions
Here is the
materials list and the steps I took to make my own style and size of bottle cap
pincushion.
Materials:
bottle cap ( I
used a juice bottle cap that measured approximately 2 inches across)
felted wool or
acrylic wool (I used bits of felted wool)
Polyester
fiberfill
thread (you can
match your felt or use a contrasting color depending on how you want it to
look)
hand sewing needle
small sharp
scissors
beads or buttons
for decorations (optional)
clear floral
stones that are flat on one side ( to add a bit of weight to the pincushion)
jewel glue (make
sure it is permanent glue used to adhere beads, rhinestones, etc to fabric)
hot glue gun or
fabric glue
1. Most instructions ask you to cut out a circle. I
decided to place some jewel glue in the center of the cap and then place onto a small square of fabric then I just trimmed around the cap with a small pair of sharp scissors.

2. Cut a strip
of felt to fit around the bottle cap, make sure you cut it about 1/8 to
1/4 of an inch wider than the lip of the bottle cap. Cut it long enough
to go around the cap and slightly overlap on the other edge. You can use
a rotary cutter and cutting mat or just use a pair of scissor like I did.

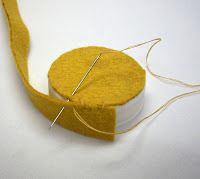
3. I don't
do embroidery so I used matching thread and did a simple whip stitch to attach
the strip of felt to the felt on the base of the bottle cap. The glue on
the bottom of the cap helps to hold the base felt in place so all I had to do was
to hold on to the edge strip of felt while I sewed around the base.
4. Stick the floral stones to the inside of the cap with hot
glue. This will help to hold everything together when sewing the top of the
pincushion on.
5. Cut out a
circle 3 1/2 inches in diameter. If you want you can decorate your circle
with the beads or buttons at this point or you can wait until you are finished
making your pincushion. It is easier to decorate the circle while it is
flat but the choice is yours. I was using beads so I decided to decorate
it now. If you want to do an embroidered design that would look great
too.
6. Sew a
running stitch around the outer edge of the circle and pull tight to create a
small "cup". Stuff the "cup" firmly with
polyester fiberfill then tie off your thread.
7. You can hot glue the top of the pincushion in place over the floral stones, or just hold it in place and stitch the top to the side strip of the cap.
8. Using a
hot glue gun with a fine tip point I added a thin line of glue along the edge
of the side strip and added some metallic braiding to finish it off. You
could also use fabric glue if you do not have a glue gun or rather not use one.
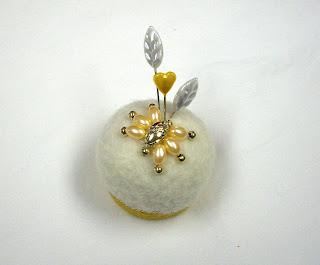
9. I decided
a few more beads were needed and so I sewed on a few more and then I added
3 usable quilter's pins as an extra decoration.
10. I did a
second one and instead of metallic braiding I added pearls that come pre-strung
and sold on a spool or by the yard at any JoAnn Fabrics or Hobby Lobby. I
stitched them on taking a stitch between beads using white thread.
These pincushions
are fun and easy to put together and would make great gifts. Decorate
them however you like adding beads, sequins, felt cutouts or embroidery, the
possibilities are endless and only restricted by your imagination.


8 comments:
Great idea and tutorial! Thank you for putting this together! TOO CUTE!
Ann, your pincushions are just delightful! So pretty! I thoroughly enjoyed reading your tutorial and these will make a great project for me to work on while sitting at football practice. I even have an adaptor in my car to plug the glue gun into. LOL Thanks so much for sharing. : )
your pincushions are so pretty. Thanks for sharing with the rest of us.
Great idea and you are so creative!
Thanks all for the lovely comments.
Love the challenge you set for yourself. I will definitely be following along! I make my sewing room at least 6 pincushions a year, as mine get used so much they start looking tacky. I'm due for new ones, so your tutorials are perfect!
Very cute! I love the extra pins.
So pretty!
Post a Comment