Wednesday, April 17, 2013

WIP Wednesday - My Twelve Step Quilting

The last time I left off on Step 5 of my "Twelve Step Quilting Program" and unforutnately last week was taken up with doctor's appointments so I had to skip my WIP update.

This week I have moved on to

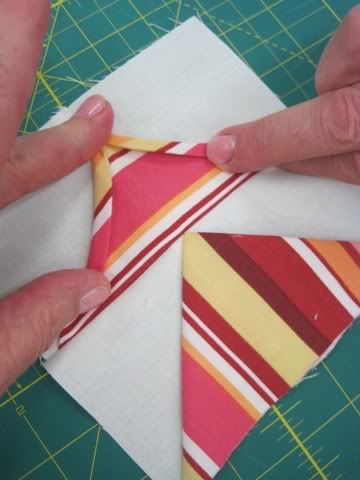
Step 6:  Cut all the string squares into triangles and trim to size.


Step 7:  Remove all the paper foundations pieces.  The instructions for this pattern called for a small stitch length and I am happy to find that it comes in very handy when removing the paper foundations.  Its as if the paper were perforated and they peel off very easily.


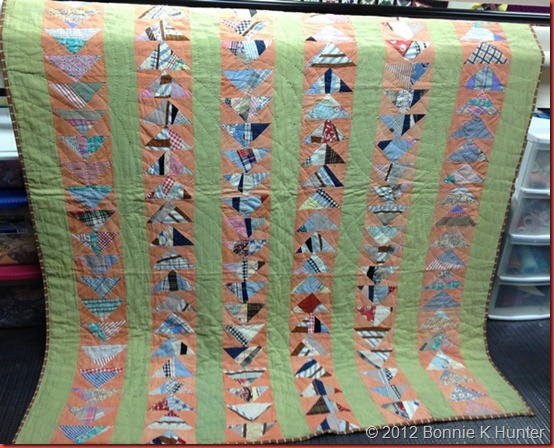
Step 8:  Cut out my geese "wings" out of the gold toned fabric and start to finish off my flying geese sections.


Since this is a scrap quilt I don't know how far the number of geese I have will take me but I am anxious to see a finished product so I will stitch these together and make whatever size quilt I can.

I have 4 more steps to go to make this a true 12 step program and I hope that I will be able to make my way to the end of the road with this project. If you drop in please leave a comment and feel free to give out suggestions.  What has helped you work through a project to the end?  Are you a UFO (unfinished object) collector or do you work through one project at a time?

I hope that you have a smooth trip down "life in the craft lane" and are inspired to jump "on the wagon" with me and find a creative use for your scraps.

Monday, April 15, 2013

Picture Frame Pin Cushion - Day 13 of 100 Days on Pins and Needles


I have several empty picture frames lying around and this project seemed a fun way to use them to create something for my sewing space.  If you don't have any frames a quick trip to your local Dollar Store could fix that inexpensively, which is what I did to give this project a trial run.


The one in the tutorial was painted with acrylic paint but I used a small silver frame that I purchased at the Dollar Store to try out this project.  This is a project that you could do with a vintage frame and it can be set up as a display piece or lay it flat and use it when you do handwork.  It can be made using a large or small frame and embellish it with beads, buttons or other trinkets glued on the frame or sew them onto the pincushion edges.  It is an easy to do pincushion idea that required no sewing and the way I made mine I didn't even use any glue.


I used my silver toned frame that reflects the color of items around it and added some decorator fabric for the pincushion area.  I folded a small piece of polyester batting to just slightly larger than the opening of the frame.  I then layered the decorator fabric over it, centering the design I wanted to focus on.  I then pushed the batting through the opening to create the "pincushion" part, cut the fabric the size of the frame and tucked it into the frame edges and then slipped the back of the frame into place.  It may take a bit of effort to get the frame backing on because the fabric makes it a tighter fit, but it was great because I didn't have to glue or sew anything.


If you have a special frame you don't want to throw away find some fabric that works with it and make a pincushion.  Give it as a gift or display in your home, the possibilities are endless.

If you drop by to check things out please leave a comment and share any ideas you have.  May you frame your road down "life in the craft lane" with lots of memories.

Thursday, April 11, 2013

Thursday Tips and Tricks

Once more I have found a tutorial that will cut down on your sewing and piecing time when creating a quilt with flying geese blocks in it.  A simple to follow "one seam" flying geese, how much better can it get?


I have seen this done before but have yet to use it in anything I have created, it certainly looks easy to do which makes it an idea to keep handy.  

My second tip is not for sewing but a storage tip from "Sew Quilt Blog".  


This blog has some great project storage tips that are easy and inexpensive as well as how to keep your storage bins looking cohesive.

Hope you enjoy these tips and find some ways to incorporate these into your sewing or storage as you take your daily walk down "life in the craft lane".  If you drop in please leave a comment and let me know what you think about these ideas and how you can use some of these tips.

Thursday, April 4, 2013

Thursday Tips and Tricks

Today I decided to give out two tips.  The first one is actually a finish used on clothing but I thought it would also make a great border embellishment on a quilt.


The "shark teeth finish" is typically a clothing design but can you just imagine this look all around a quilt border?  I think this would look beautiful on an heirloom quilt in a shabby chic design.  I hope you give this technique a try, I think I certainly will use it sometime soon.

The second tip is how to create a variety of looks using a simple striped fabric block.  It's all in how you cut it out and reposition it.


Using striped fabric you can create some beautiful block designs with a lot less sewing.


Create this beautiful Seminole Patchwork design by simply offsetting the stripes.  You will find a variety of design combinations to use in this tutorial. 

Let your imagination run wild and see if you can incorporate the "sharks teeth" into your sewing or quilting or create a beautiful quilt with striped fabrics.  I hope that somewhere along your travels down " life in the craft lane" you are able to use these ideas.  Drop in and share your thoughts or if you have been looking for a tutorial on a particular technique just let me know and I will help you search the internet.  It could be something others have been looking for also.

Wednesday, April 3, 2013

WIP Wednesday - My Twelve Step Quilt Program

Hello everyone, my name is Ann and I am addicted to collecting fabric.  I don't just keep adding to my stash but I can't seem to throw any scraps away and it is totally getting out of hand so I started my own 12 step program.

Step one:  find a scrap quilt pattern that I could quickly and easily put together. So I started at one of my favorite blogs Bonnie Hunter at quiltville.com.  She has so many beautiful patterns to use up those pesky old bits and pieces of fabric and one called Geese on a String using paper foundations caught my eye.

Geese on a String by Bonnie Hunter

Step Two:  gather up all those scraps of fabric I planned to use.  I have a hard time randomly using fabrics of different colors, I find my self trying to keep the colors balanced and end up losing the whole concept of "scrap" quilting.  Because of this I decided to keep it in the brown, gold and orange color scheme, which I had plenty of.  I know it is Spring so tossing in the bright orange fabrics seems to really brighten up my color scheme.

Step Three:  find paper I could use for the foundations.  I first started with tracing paper but quickly switched to using up old phone book pages cut to size.

Step Four:  start sewing.  I have set aside 20 to 30 minutes a day to create at least 5 squares that will be cut in half on the diagonal to create the triangles needed for the flying geese.  This is what I have so far.


Step Five:  I chose a gold toned fabric for the triangle wings and when they are finished they will be combined with strips of the yellow and orange floral fabric 


I can only hope that I will not fall off my wagon and continue on to finish up the next 7 steps of my self imposed program.  I will let you know next week how it goes on the wagon down the road on "life in the craft lane". 

Monday, April 1, 2013

Pincushion Dish - Day 12 of 100 Days on Pins and Needles


Do you have one odd dish from a long lost set?  How about a vase you no longer use for flowers but can't bear to throw out?  Well after reviewing my collection of pincushion ideas I found this quick and easy project that transfers any small dish or vase into a lovely sewing room addition. 


For my first sample at the top of the page I used a small parfait dish and inserted my pincushion form and turned it into a handy pincushion on a pedestal.  My pincushion fit in the dish nice and tight so I didn't have to glue it to secure in place.

My second option, below, I made using my previously made "tomato" pincushion and a small Japanese tea cup that I found at the thrift store.  Once more the pincushion form fit in it nice and tight, so I don't have to worry about it falling out.


This tutorial is super easy to follow and takes only a few items to create a handy and cute addition to your sewing space.  Remember all you need is a dish or small vase, some fabric scraps, fiberfill, a pair of scissors, a needle and thread  then just click on the link above and find the instructions to start creating.

I hope you enjoy another fun idea for a quick and easy Mother's Day gift idea, add some special embellishments and create a very special one of a kind pincushion.  Don't have a dish or vase, check out your local thrift stores and see what you can find.

Enjoy this new idea to turn a household item and a few sewing or craft items into a great looking sewing accessory and don't forget to leave a comment or share what your are making.  

Drop in every Monday and join me in my search to find 100 different pincushion ideas as I take a walk down "life in the craft lane".